Sun-damaged car paint is a common problem for many car owners, especially those living in regions with intense sunlight. Over time, the relentless exposure to UV rays can cause the paint on your car to fade, oxidize, and lose its glossy finish. If left untreated, this damage can lead to a dull and unattractive appearance, reducing the value and aesthetics of your vehicle. Fortunately, with the right tools and techniques, you can repair sun-damaged car paint and restore your car’s original shine. In this informative instruction, we will lead you through each stage of the procedure.
Understanding Sun Damage to Car Paint
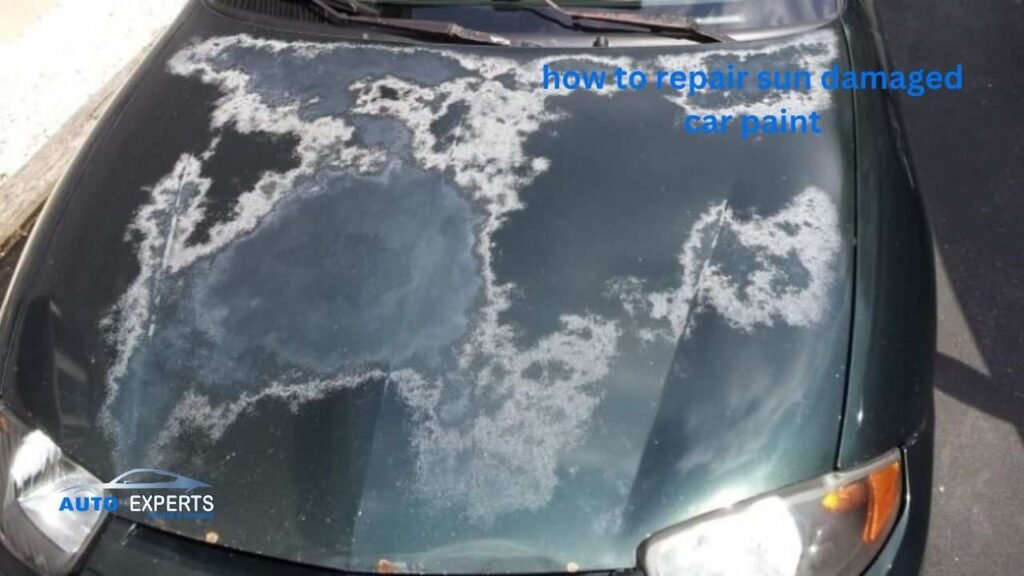
Before starting the repair procedure, it’s critical to understand how the sun affects the paint on cars. Ultraviolet (UV) rays from the sun are the primary culprits. Over time, these rays break down the chemical bonds in the paint, leading to oxidation, fading, and eventually, the clear coat peeling off. The extent of the damage is determined by factors such as paint color (darker colors absorb more heat), paint quality, and sun exposure time.
Tools and Materials You Will Need
Before you start repairing the sun-damaged paint, make sure you have the following tools and materials on hand:
- Car Wash Soap: A gentle, pH-balanced soap to clean the car’s surface.
- Clay Bar Kit: To remove contaminants and prepare the paint for correction.
- Polishing Compound: To remove oxidation and restore the paint’s shine.
- Car Polish: A finer product than compound, used to enhance the gloss.
- Car Wax or Sealant: To protect the paint after polishing.
- Microfiber Towels: Soft towels to avoid scratching the paint.
- Electric Buffer: Optional, but recommended for more consistent results.
- Protective Gear: Gloves and safety glasses to protect your hands and eyes.
Step 1: Thoroughly Wash the Car
The first step in repairing sun-damaged paint is to give your car a thorough wash. Use a gentle, pH-balanced car wash soap to remove dirt, grime, and any loose contaminants from the surface. This is crucial because you don’t want to rub dirt into the paint during the subsequent steps, as it can cause scratches.
- Tip: Wash your car in a shaded area or early in the morning/late afternoon to avoid water spots caused by the sun.
Step 2: Clay Bar Treatment
After washing, the next step is to use a clay bar. A clay bar removes embedded contaminants that regular washing might not eliminate. These contaminants can include industrial fallout, brake dust, and tree sap, which can accelerate the oxidation process.
- Lubricate the Surface: Spray the surface with a clay lubricant or a quick detailer.
- Glide the Clay Bar: Gently glide the clay bar over the lubricated surface in a back-and-forth motion. You’ll feel the bar picking up contaminants. Fold and knead the clay as it becomes dirty.
- Wipe Clean: Once you’ve clayed the entire car, wipe off any residue with a microfiber towel.
- Tip: Use light pressure when claying. The goal is to let the clay bar do the work, not to force it into the paint.
Step 3: Assess the Damage
After cleaning the surface, examine the paint to determine the extent of the sun damage. If the paint has only minor oxidation and fading, polishing should suffice. However, if the clear coat is peeling, you may need professional help to respray the damaged areas. This guide focuses on repairs that can be done at home, so for severe damage, consider consulting a professional.
Step 4: Apply Polishing Compound
Polishing compound is a slightly abrasive product that removes a thin layer of paint to eliminate oxidation and minor scratches, revealing fresh, undamaged paint underneath.
- Apply Compound: Use a foam applicator pad to apply a small amount of polishing compound to the affected areas. Work in small sections to avoid the compound drying out.
- Buff the Area: If you’re using an electric buffer, set it to a low speed. Gently buff the compound into the paint in a circular motion. If doing it by hand, apply firm, even pressure as you work the compound into the surface.
- Check Your Progress: Wipe off the compound with a clean microfiber towel and check the results. Repeat the process if necessary.
- Tip: Less is more when it comes to polishing compound. Begin with a little amount, and you can always add more as needed.
Step 5: Polish the Paint
After removing the oxidation with a compound, it’s time to refine the paint’s finish with a polish. Polishing helps restore the gloss and prepares the surface for wax or sealant.
- Apply Polish: Using a clean applicator pad, apply the polish to the paint. Again, work in small sections.
- Buff the Surface: Buff the polish into the paint using either an electric buffer or your hand. Use circular motions and ensure the polish is evenly spread.
- Wipe Clean: Use a microfiber towel to wipe off any residue and admire the revived shine of your paint.
- Tip: If you’re using an electric buffer, be sure not to stay in one spot for too long, as this can generate heat and potentially damage the paint.
Step 6: Protect with Wax or Sealant
Now that the paint is restored, it’s essential to protect it from future sun damage. Applying a high-quality car wax or sealant adds a protective layer that reflects UV rays and shields the paint.
- Apply Wax/Sealant: Using a clean applicator pad, apply the wax or sealant in a thin, even layer. Work in portions to guarantee full coverage.
- Let it Cure: Allow the product to cure according to the manufacturer’s instructions. This usually takes a few minutes.
- Buff Off Residue: Once cured, use a clean microfiber towel to buff off the residue, revealing a smooth, glossy finish.
- Tip: For maximum protection, consider applying two coats of wax or sealant. Wait a few hours between coats to allow proper curing.
Step 7: Regular Maintenance
Repairing sun-damaged paint is only part of the solution. Regular maintenance is essential for keeping your vehicle’s paint in perfect condition. Here are some tips:
- Wash Regularly: Regular washing prevents dirt and contaminants from embedding into the paint.
- Wax Every Few Months: Reapply wax or sealant every 3-4 months to maintain protection.
- Park in the Shade: Whenever achievable, park your automobile in a covered place to reduce sun exposure.
- Use a Car Cover: If you don’t have access to a garage, consider using a car cover to protect the paint from the sun’s rays.
Step 8: Consider Professional Help for Severe Damage
If your car’s paint has severe sun damage, such as extensive peeling of the clear coat or deep oxidation that DIY methods can’t fix, it may be time to seek professional auto experts help. A professional detailer or body shop can assess the damage and recommend repainting or clear coat restoration.
- Tip: When choosing a professional auto repair shop, look for reviews and recommendations to ensure quality work.
Final Thoughts
Sun-damaged car paint doesn’t have to be a permanent problem. You can restore your car’s paint to its original beauty with the correct equipment, procedures, and a little elbow grease. Regular maintenance and protective measures will help keep your car looking new for years to come. Remember, consistent care and attention to your vehicle’s paint are the key to preventing sun damage. By following the steps outlined in this guide, you can ensure that your car remains a shining example of how to repair and maintain sun-damaged paint effectively.
For Wikipedia page creation agency visit.